Requirements
WordPress requires a fairly simple server set-up, one that many hosts include, even under their cheapest packages. It requires PHP version 4.2 or greater, MySQL version 4.0 or greater, and if you want nice permalinks, something we will get into later in this guide, we will also need the Apache mod_rewrite module.
If you don’t know what your host has, just ask them, especially since some smaller hosts are very willing to add the needed software to get things working, at least that is the experience I have had.
Downloading the Software
To get your copy of WordPress, you only have to go to www.wordpress.org/download where they will have big buttons for both a Zip and Tar.gz download. Linux users might be more inclined to grab the Tar.gz format, and Windows users will have an easy time with the Zip format download. The files in both downloads are exactly the same, just the compression used is different.
For this guide we will be downloading the Zip file, so all it takes is a single click on the Zip graphic, and then saving the file somewhere easy to remember. I usually put my active projects on my desktop.
Unzipping WordPress
Because WordPress comes in a compressed file, you have to decompress it to get all the files needed to run WordPress.
There are many tools for each operating system that can be used to decompress WordPress. Linux and Windows XP and above users will be able to use the built-in tools to get the files.
Extract all the files inside the zip. You should get a folder called WordPress, which included inside are other folders and files. This is the WordPress software and what you will be uploading to your web host.
Adding a Database (using cPanel)
Most people have hosting companies that use cPanel as the customer level control panel. If you are using Dreamhost or a hosting company that uses a custom control panel, contact your web host for information on adding a database.
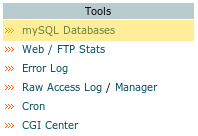 For those of you in a cPanel environment, look for the mySQL Databases link, usually under Tools. Once you click this link, you will be brought to a screen with a fair bit of information. We are looking to create a new database, as well a new user for that database.
First, find the create database area, and input a name for your new WordPress database. I like to use something fairly cryptic so that any hackers have an even harder time getting at my data.
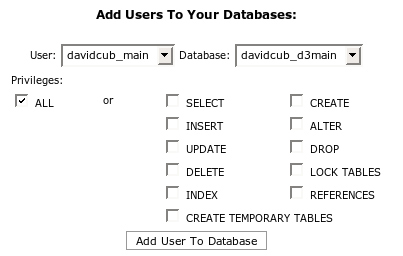
Once you have added the database, you should then look for the area that allows you to add a new user. Add a user name and password, and click the create user button.
You then need to make sure that the user is added to the database with all of the privileges.
Configuring wp-config.php
The only file that you need to create for WordPress’ included software is the wp-config.php. Thankfully, they provide you a sample file from which to work from called wp-config-sample.php. The wp-config.php file needs the required database information for the software to connect to the recently created database.
There are very few things you need to change, and thankfully it is all information that you created when creating your database for WordPress. The files are nicely commented, and so I don’t see any reason to put up a information on each line.
Here are the five most important lines:
define(‘DB_NAME’, ‘putyourdbnamehere’); // The name of the database
define(‘DB_USER’, ‘usernamehere’); // Your MySQL username
define(‘DB_PASSWORD’, ‘yourpasswordhere’); // …and password
define(‘DB_HOST’, ‘localhost’); // 99% chance you won’t need to change this value
$table_prefix = ‘wp_’; // Only numbers, letters, and underscores please!
The last line, $table_prefix is really only important if you already have a WordPress blog installed. Changing the table prefix will allow you to install multiple WordPress blogs in the same database, so if you are limited in the number of databases you have, you are not entirely limited in the number of WordPress blogs you can have.
Uploading WordPress
To upload WordPress you will need your FTP information from your web host handy. This is the information they gave you when you created your account. It will include your domain, user name, and password. It may be the same as your cPanel information, or it may be different. If you don’t have this information, please contact your web host.
Enter your connection details into the correct area of your FTP software, where it says host, user name and password, and click connect. We will not be uploading the WordPress folder, just its contents, so open the WordPress folder, select all the files and folders within, and upload it. The program will then confirm that you want to upload these files. Click OK to continue.
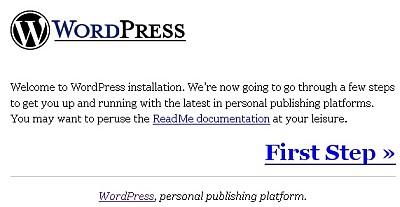
Explanation of the Install Process
WordPress needs to add information to the database we created. It will take the connection information that you added to the wp-config.php file, and also asks for few more details from you. It will then put all the information that it will need into the database, and create the default blog.
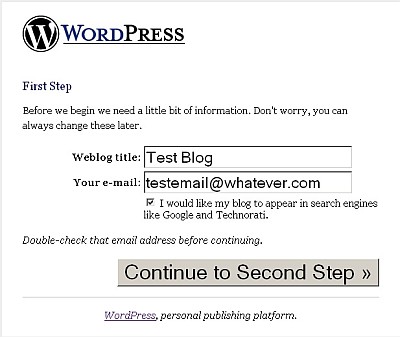
One of the first things that the WordPress install process will do is ask what you want to call your new WordPress blog as well as what your e-mail address is. It also asks if you would like your blog to be seen by Search Engines like Google as well as the popular blog indexing tool Technorati.
Once it has taken all the information it needs from you, it fills the database, and gives you your login information. It creates a random password for the user name “admin”.
Make sure you record this password, as if lost, it can take someone with a fair bit of experience with databases to fix the problem.
With this password, you will now be able to log into WordPress, and begin publishing your blog.
Readme.html
I always suggest that first time WordPress installers read the included readme.html file that ships with WordPress. It includes a quick overview of WordPress’ Famous 5-minute install, upgrading, a list of online resources, as well as some other important details. While it is short, it is written very well, and highlights some important features and details, and includes the all important link to the WordPress.org/support forums.
wp-admin/install.php
To start the install process, you have to go to your blog’s URL, forward slash wp-admin, forward slash install.php.
e.g. www.testblog.com/wp-admin/install.php
Enter Required Information
You will then be required to fill out some simple information.
And if you have done it correctly, you should see a message indicating your success.

Fantastico Install (One-Click Install Process)
 Some hosts have a tool that allows you to install WordPress without needing to create a database and edit any files, these “One Click Install” processes are common on hosts and WordPress is commonly listed in the tools that can be installed in such a manner.
Fantastico is one such “One Click Install” application, and WordPress is listed in its installable programs. You have but only to click on WordPress, and enter some details, and it will create the database, create te wp-config.php file, and install WordPress. Again, make sure you select a password you can remember for your admin account.
Originally posted on December 10, 2007 @ 10:09 pm